Connecting your domain from Namecheap to your hosting provider, KnownHost, is a crucial step in establishing your online presence. This article will guide you through the process step-by-step, ensuring you have all the information needed to successfully associate your Namecheap domain with KnownHost.
Understanding Domain and Hosting
To successfully associate your Namecheap domain with KnownHost, simply update the nameservers in your Namecheap account to point to KnownHost’s nameservers, and configure your domain settings in KnownHost’s cPanel. This ensures your website is live and accessible, streamlining your online presence.
What is a Domain Name?
A domain name is your website’s online address, allowing visitors to access your content easily. Think of it as your business’s virtual storefront; it needs to be memorable and relevant to your brand. A well-chosen domain name enhances your online identity and professionalism.
What is Web Hosting?
Web hosting is a service that stores your website’s files and makes them accessible on the internet. When users type your domain name into their browser, they are directed to the servers hosting your website. Without hosting, your domain would be just a name with no content attached to it.
Why Connect Your Domain to Hosting?
Associating your domain with a hosting provider is essential for several reasons:
- Brand Identity: A connected domain establishes credibility.
- SEO Benefits: A properly configured domain can enhance search engine visibility.
- Accessibility: It ensures users can access your website without issues.
Prerequisites for Connection
Required Accounts
To associate a Namecheap domain with KnownHost, you need active accounts with both services. If you haven’t signed up yet, create an account on Namecheap for your domain and KnownHost for your hosting.
Essential Information
Before proceeding, gather the following:
- Nameserver Details: You will need the nameservers provided by KnownHost.
- Basic DNS Understanding: Familiarize yourself with terms like A Records, CNAME Records, and MX Records, as they will be referenced later.
Step-by-Step Guide to Associating Namecheap Domain with KnownHost
Step 1: Retrieve Nameserver Information from KnownHost
- Log into Your KnownHost Account: Visit the KnownHost website and sign in.
- Access Your Account Dashboard: Look for the section labeled “Account” or “Domains.”
- Find Nameserver Details: Typically, this information is available in the hosting setup documentation or under your account settings.
Step 2: Log in to Your Namecheap Account
- Visit Namecheap: Go to the Namecheap website.
- Sign In: Enter your credentials to access your account.
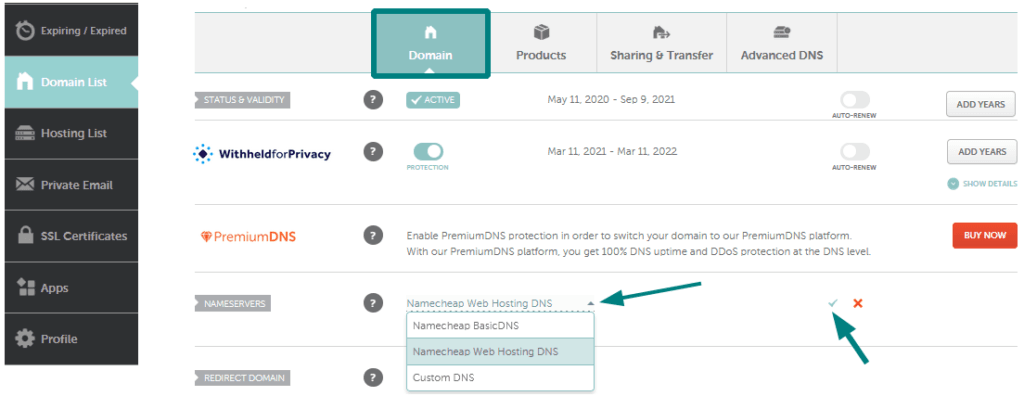
Step 3: Update Nameservers in Namecheap
- Navigate to Domain List: On the dashboard, locate the “Domain List” option on the left sidebar.
- Select Your Domain: Click on the domain name you wish to connect to KnownHost.
- Update Nameservers:
- Scroll to the “Nameservers” section.
- Select “Custom DNS” from the dropdown menu.
- Enter the nameservers you retrieved from KnownHost.
- Save Changes: Ensure to click the save button, as changes can take a few minutes to propagate across the internet.
Configuring Your Domain in KnownHost
Step 4: Accessing KnownHost’s cPanel
- Log into KnownHost: Use your credentials to access your account.
- Navigate to cPanel: Click on the cPanel link from your account dashboard.
Step 5: Adding Your Domain in cPanel
- Locate the Domains Section: In the cPanel interface, find the “Domains” section.
- Add Domain: Click on “Addon Domains” or “Domains,” depending on your plan, and follow the prompts to add your domain.
Step 6: Configuring DNS Records
- Access DNS Zone Editor: Within cPanel, locate the “Zone Editor.”
- Set Up Records:
- A Record: Point to your hosting server’s IP address.
- CNAME Record: Use this for subdomains or aliasing your domain.
- MX Records: Set these for email services associated with your domain.
Also Read: How to Find Hidden Stuff on iPhone
Verification Process
Step 7: Checking DNS Propagation
- Use Online Tools: Websites like WhatsMyDNS.net can help you check if your DNS changes have propagated.
- Confirm Changes: Look for your domain to resolve to the correct IP address.
Step 8: Accessing Your Website
- After DNS propagation, try entering your domain in a browser to confirm it loads your website correctly.
Troubleshooting Common Issues
Common Connection Problems
If you encounter issues such as a “server not found” error or your website not loading, consider the following:
- Check Nameserver Entries: Ensure you entered the correct nameservers in Namecheap.
- Propagation Time: Remember that DNS changes can take anywhere from a few minutes to 48 hours to fully propagate.
When to Contact Support

If problems persist, reach out to the support teams of Namecheap or KnownHost. Both services provide customer support to assist with connection issues.
Conclusion
Associating your Namecheap domain with KnownHost is a straightforward process that significantly impacts your online presence. By following the outlined steps, you can ensure a smooth transition and setup for your website. Don’t hesitate to explore the additional features offered by KnownHost and enhance your online experience further!
FAQs
Yes, you can use your Namecheap domain with other hosting providers. The process involves changing the nameservers in your Namecheap account to those provided by your new hosting provider, similar to the steps outlined for KnownHost.
DNS changes typically take anywhere from a few hours to 48 hours to propagate fully. During this time, some users may still see the old website while others see the new one. It’s important to be patient and check back later if your site doesn’t appear immediately.
If your website doesn’t load after updating the nameservers, first check the DNS propagation using online tools like WhatsMyDNS. If the correct IP address isn’t showing, double-check that you entered the nameservers correctly in your Namecheap account. If everything appears correct but issues persist, reach out to your hosting provider’s support team for assistance.